Computer-Based Procedures

Idaho National Laboratory

Computer-Based
Procedures

Close

Please place a login name before proceding

Computer-Based Procedures

Idaho National Laboratory

Computer-Based
Procedures

Welcome,

Select New Procedure:

Select
Close

Please Select a Procedure

Computer-Based Procedures

Swapping Between Supply and Exhaust Fan Sets

1. SCOPE

1.1 This procedure provides instructions for making available and placing in service Auxiliary Building general (non safeguards) ventilation equipment, including switchgear ventilation.

1.2 This procedure does NOT contain instructions for making available and placing in service Auxiliary Building Safeguards Ventilation (ABVS) equipment.

2. DISCUSSION

2.1 ABSVS is normally in service continuously. However, if part or all of the system is shut down for maintenance, sections of this procedure should be used to return it to service.

2.2 ABSVS consists of two sets of supply and exhaust fans.

2.3 Occasionally, due to weather conditions or equipment malfunctions, combating high or low temperatures in one or more rooms served by this system becomes necessary.

3. RESPONSIBILITIES

3.1 Operations personnel are responsible for operation of equipment in accordance with this procedure.

4. PREREQUISITES

4.1 Prior to placing ABSVS in service, ensure that applicable portions of the following equipment are energized:

  • 480V vital buses
  • 480V non vital buses
  • 120V instrument AC distribution panels
  • 125V DC distribution panels

5. PRECAUTIONS AND LIMITATIONS

5.1 Motors on equipment operated in this procedure are rated at 50 hp or less. Frequent starting without running time or idle time to permit cooling should be avoided.

5.2 Do NOT turn on redundant supply fans or redundant exhaust fans at the same time.

5.3 When manually operating exhaust fans, check local backdraft dampers for proper positioning.

  ADDITIONAL JOB INFORMATION

Computer-Based Procedures

Swapping ASW Pump and CCW HX Train

1. SCOPE

1.1 This procedure provides instructions for swapping the operating pump, the in-service heat exchanger (HX), or both, when the System is in single-pump, single-HX operation.

1.2 When placing a standby component in operation, this procedure places the opposite train component into standby, and does NOT remove it from service. REFER TO PROCEDURE-123, "Shutdown and Clearing", to remove a pump from service.

1.3 This procedure does NOT contain directions for establishing or restoring from two-HX operation. REFER TO PROCEDURE-12, "Two Heat Exchanger Operation", to establish or secure from System alignments using two HXs.

2. DISCUSSION

2.1 Swapping pumps and HXs is normally done to equalize operating hours of redundant equipment. This practice provides for more effective surveillance of equipment performance and reliability.

3. RESPONSIBILITIES

3.1 Operations personnel are responsible for operation of equipment in accordance with this procedure.

4. PREREQUISITES

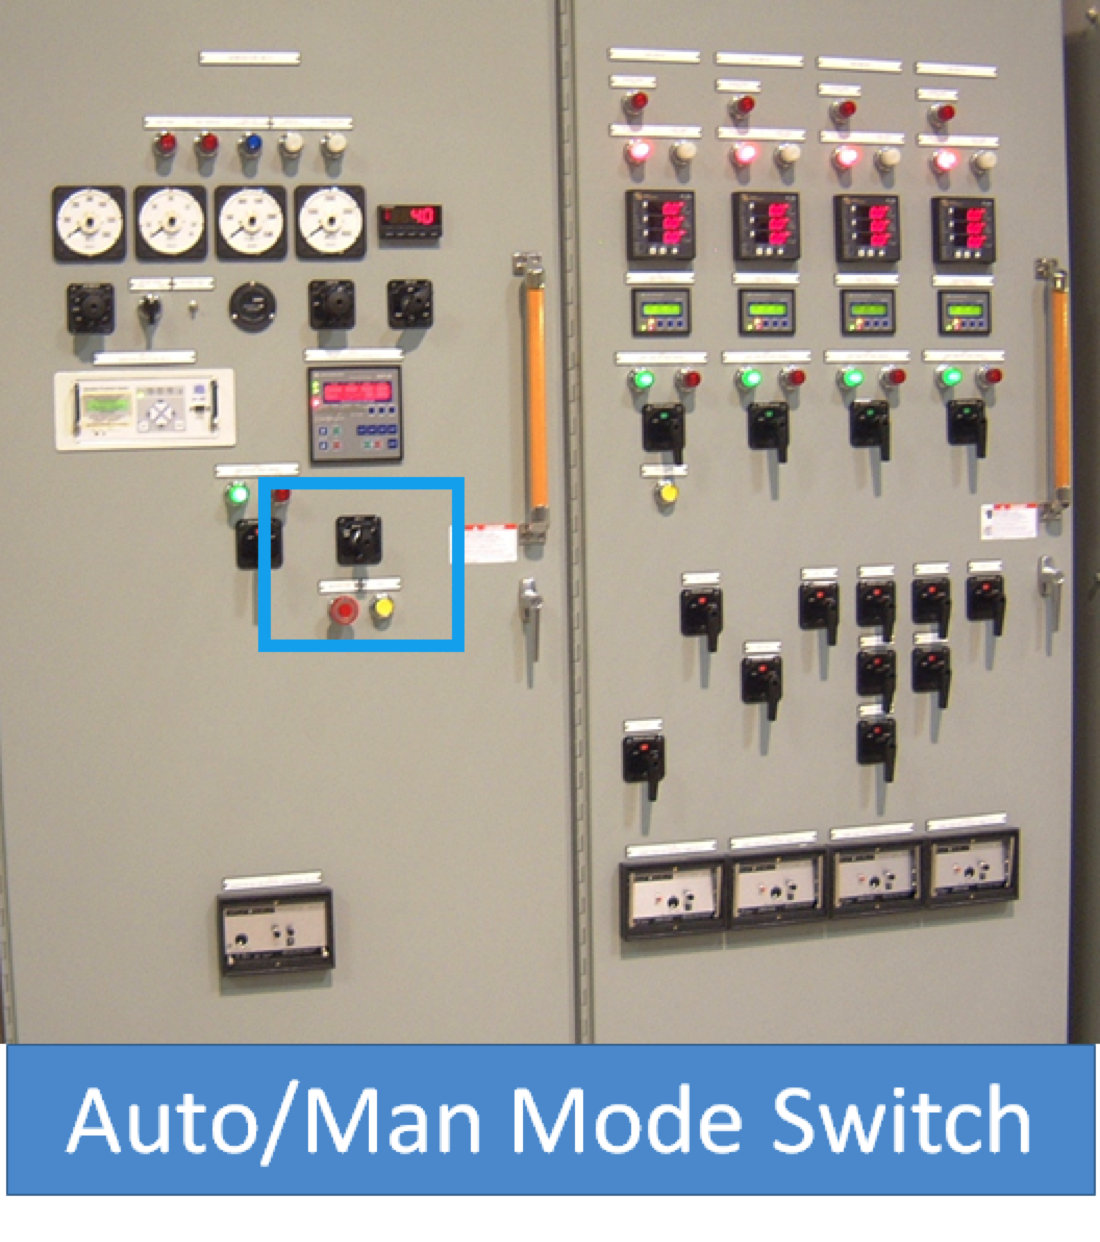
4.1 Ensure that the System is aligned for normal operation PER PROCEDURE-1, "Make HX Available."

5. PRECAUTIONS AND LIMITATIONS

5.1 Pump motor starting frequency shall not exceed the following limits:

  • • Three starts at any desired interval in any 15-minute period provided motor runs 10 minutes during the period.
  • • Three starts in any 30-minute period if the motor does not run between starts. If a motor trips out on overcurrent, this should be counted as two starts.

5.2 Starting or stopping a pump may result in a low pressure auto-start of a pump on the opposite unit. This is believed to be caused by a pressure wave which is transmitted to the opposite unit via the unit crosstie valve.

  ADDITIONAL JOB INFORMATION

Comment Here

Add Note Cancel
Computer-Based Procedures

Swapping Between Supply and Exhaust Fan Sets

CAUTION:
DO NOT run both fan sets at the same time. Both are 100% capacity fan sets, and running them together results in excessive air flow.

6.1 Which fan set is in service?

Exhaust-2A Supply-2A

Exhaust-2B Supply-2B

6.1.1 Are the control switches for both & in "AUTO"?
Is {Exhaust} in "AUTO?"
Scan

Yes

No


Is {Supply} in "AUTO"?
Scan

Yes

No

6.1.2 Perform Procedure-H1, Section 6.2, "Placing in Service Exhaust-2A/Supply-2A and/or Exhaust-2B/Supply-2B, Supply and Exhaust Fan Sets" and continue when finished.
6.2 Place the control switch for supply fan {Supply} in "OFF".

OFF

NOTE:
The fan set in standby will auto-start about 60 seconds after turning off the in-service fan set.


6.3 (a) Wait 60 seconds.

Time remaining: 00:00

6.3 (b) Ensure that & auto-starts.
Supporting References:

Auto-Started

6.3 (c) Place control switch for (running) supply fan in "ON".
Supporting References:

ON

6.4 Place control switch for {Supply} (shutdown) supply fan in "AUTO".
Supporting References:

AUTO

6.5 Place control switch for {Exhaust} (shutdown) exhaust fan in "AUTO".
Supporting References:

AUTO

6.6.1 Record Differential Pressure Readings (DP) on Magnehelic Gauge 1A, Room 101.
Acceptable range: -0.3 to -0.5 "wg

6.6.2 The Differential Pressure Reading (DP) on Magnehelic Gauge 1A, Room 101, is out of range. Please contact the Control Room.
Recorded reading: "wg
6.7.1 Record Differential Pressure Readings (DP) on Magnehelic Gauge 2A, Room 202.
Acceptable range: -0.3 to -0.5 "wg

6.7.2 The Differential Pressure Reading (DP) on Magnehelic Gauge 2A, Room 202, is out of range. Please contact the Control Room.
Recorded reading: "wg
End of Procedure: Swapping Between Exhaust-2A/Supply-2A and Exhaust-2B/Supply-2B, Supply and Exhaust Fan Sets.

Completed

Comment Here

Add Note Cancel
Computer-Based Procedures

Swapping ASW Pump and CCW HX Train

NOTE:
It is important to ensure the configuration of the system before continuing with the task. Do not proceed if the system is not in an approved configuration.

6.1 In what configuration is the system currently in?

Pump A HX A

Pump B HX B

6.2 Advise Unit 1 Control Room to place the Unit 1 standby pump in "MANUAL", to prevent a possible auto-start.
Supporting References:

Advised

6.3 Place the Mode Selector Switch for {Pump} in "MANUAL":
Supporting References:
Scan {Pump}

In Manual

6.4 Place Control Switch for {Pump} in "START", to start pump.

Started

6.5 Ensure current is stable on {Pump}.

Stable

6.6 Determine chlorination pump flowrate:
6.7 Open {Valve} inlet valve on {HX}.
Supporting References:

Open

6.8 Open {Valve} shell-side outlet valve on {HX}.

Open

6.9 Close {Valve} shell-side outlet valve on {HX}.

Closed

6.10 Close {Valve} inlet valve on {HX}.

Closed

6.11 Shutdown {Pump}.

Shutdown

End of Swapping ASW Pump and CCW HX Train.

Completed

Back

My Notes

Add Note
Back

Not Completed

Completed

Back

View Note

edit

Text note

content

Location

Back

Add Note

Add Note
Back

Edit Note

Delete
Edit Note